GENERAL GUIDELINES
Sun Stone SPC flooring is designed to be installed as a “floating” floor. Do not secure individual planks to the subfloor with mechanical fasteners or adhesives (except for stair nosing and treads). Always undercut all door jambs. Do not install cabinets or kitchen islands on top of Sun Stone floating floors. Use care when installing wall moldings and transition strips to not fasten through flooring planks, as this can cause impingement of the floor, which may cause the floor to buckle and separate. In addition, do not apply caulking between the bottom of the base board and quarter round molding and the surface of the floor, as this can result in bucking and separating of the planks due to a buildup of compression, and contraction related stresses.
SUITABLE SURFACES
Lightly textured or porous surfaces; well-bonded solid floors; dry, clean well-cured concrete (cured for at least 60 days prior); wood floors with plywood on top. All surfaces must be clean and dust free. Can be installed over radiant heated floors (do not tum heat above 20°C or 85°F).
UNSUITABLE SURFACES
Rough, uneven surfaces including carpet and underlay. Rough, heavy textured and/or uneven surfaces may transfer through the vinyl and distort the finished surface. This product is not suitable in rooms that could potentially flood or rooms that have damp concrete or saunas. Do not install this product in areas which are exposed to long term direct sunlight such as sun rooms or solariums.
WARNING: DO NOT REMOVE OLD RESILIENT FLOORING. THESE PRODUCTS MAY CONTAIN EITHER ASBESTOS FIBERS OR CRYSTALLINESILICA, WHICH CAN BE HARMFUL TO YOUR HEALTH.
PREPARATION
The space where the SPC planks is to be installed shall be fully enclosed and the permanent HVAC system shall be operational (approx. 65°F to 80°F ) for 48 hours prior to installation. Avoid dramatic and large temperature changes. Carefully check planks for any defects before installation. Check that all BATCH Numbers and ITEM NUMBERS are the same and that you have purchased sufficient material to complete the job. Remove any traces of glue or reside from the previous flooring. New concrete floors need to dry out for at least 60 days prior to installation. Wood plank floors require a plywood sub-floor. All nail heads must be driven down below the surface. Securely nail all loose boards. Scrape, plane or fill uneven boards, holes or cracks using floor-leveling compound if sub-floor is uneven – over 1/8 in (3.2mm) within a span of 4ft (1.2m). If installing over existing tile, use a floor leveling compound to skim coat grout lines. Make sure the floor is smooth, clean, and free of wax, grease, oil or dust and sealed as necessary before laying planks
SUBSTRATE PREPARATION
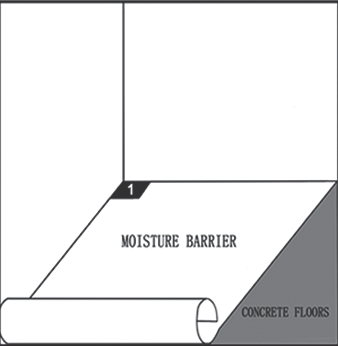
Although Sun Stone SPC flooring is not susceptible to damage from moisture, excessive sub-floor moisture is an ideal breeding ground for mold, mildew, and fungus-all of which can contribute to an unhealthy indoor living environment. Use of a suitable vapor barrier is required for all installation where the subfloors are concrete. After the SPC has acclimated, put down a vapor or moisture barrier over entire concrete floor before installation of planks. A vapor barrier is not necessary on wood subfloors. A vapor barrier is a thin sheet of plastic (4mil-6mil) that will not cause separation,but will keep the moisture at bay.
TOOLS AND SUPPLIES:
Utility knife, spacers, pencil, tape measure, ruler and safety goggles.
INSTALLATION:
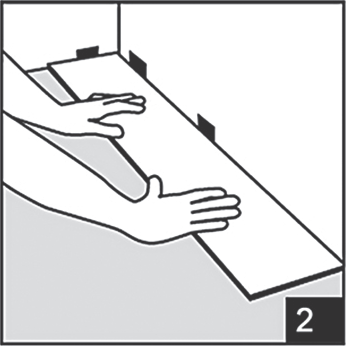
Start in a corner by placing the first plank with the tongue side facing the wall. Use spacers along each wall to maintain an expansion space of 8-12 mm(5/16 in -3/8 in) between the wall and the flooring. Diagram 2.
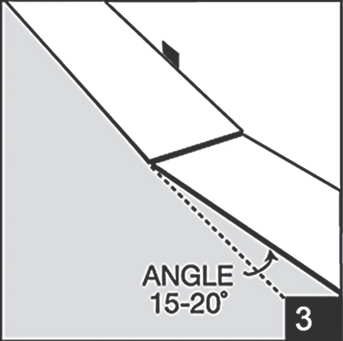
To attach the second plank, insert the end tongue into the end groove of the very first plank at an angle of approx. 15-20 degrees. When lowered, the plank will click into place. Line up edges carefully. The planks should be flat to the floor. Diagram 3.
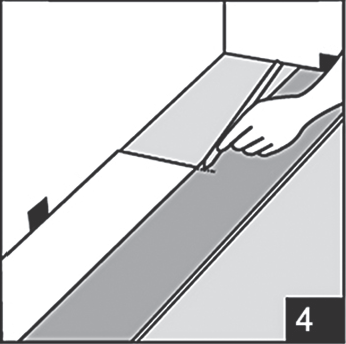
Continue connecting the first row until you reach the last full plank. Fit the last plank by rotating the plank 180° with the pattern side upward, place beside row. Measure and mark, then using a ruler and utility knife, score the plank and snap off. Attach as described above. Diagram 4.
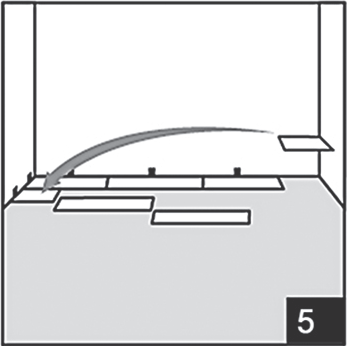
Begin the next row with the off cut piece from the previous row to stranger the pattern. Pieces should be a minimum of 20 cm(8 in) long and joint offset should be at least 40 com (16 in). Diagram 5.
NOTE: It is faster to assemble planks into a new row as the ends and then attach the entire row to the previous row on the long sides.
To start your second row, lay your first plank on the sub-floor. Take your second plank, insert the end tongue into the end groove of the first plank at an angle of approx. 15-20 degrees. When lowered, the plank will click into place with light pressure. The planks should be flat to the floor. Make sure gaps are as small as possible. Continue assembling the planks this way until you have your second row complete.
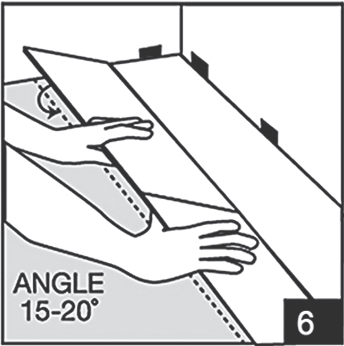
To attach the second row to the first row, tilt and push the side tongue into the side groove of the first panel at an angle of approx. 15-20 degrees. Lower and click into place lining the edges up carefully. Continue laying remaining planks in this manner. Diagram 6.
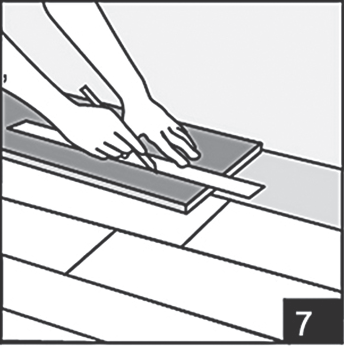
To fit the last row, lay a plank on top of the previous row. With the tongue to the wall, lay another plank upside down on the one to be measured and use it as a ruler. Don’t forget to allow room for spacers. Cut the plank and attach into position. Diagram 7.
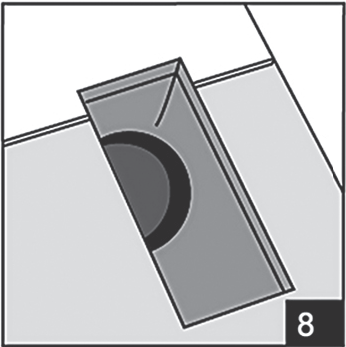
Door frames and heating vents also require expansion room. First cut the plank to the correct length. Then place the cut plank next to its actual position and use a ruler to measure the areas to be cut out and mark them. Cut out the marked points allowing the necessary expansion distance on each side. Diagram 8.
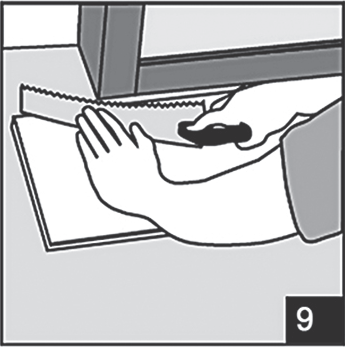
You can trim door frames by turning a plank upside down and using a handsaw to cut away the necessary height so that planks slide easily under the frames. Diagram 9.
CARE AND MAINTENANCE
Sweep regularly to remove surface grit and dust. Use a damp cloth or mop to clean up any dirt and footprints but avoid using excessive moisture. All spills should be cleaned up immediately.
CAUTION: Planks are slippery when wet. Do not use a wet spray micro fiber mop. Never use wax, polish, abrasive cleaners or scouring agents as they may dull or distort the finish.
High heels can damage floors. Use protective pads under furniture. Use doormats at entrance ways to protect floor from discoloring. Do not allow pets with unclipped nails to scratch or damage the floor.
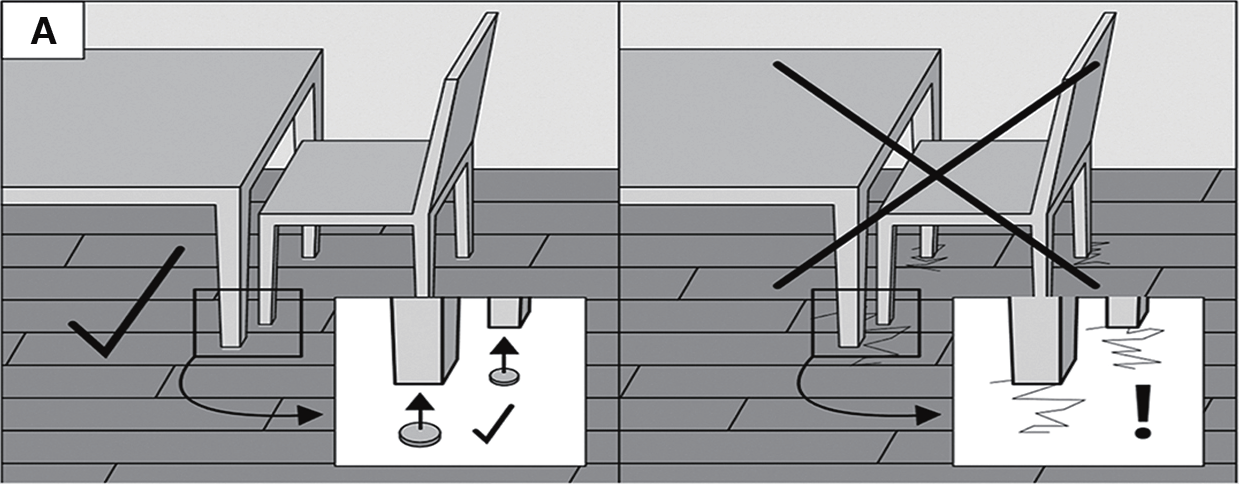
Furniture shall have protective glides of at least 1 inch diameter to minimize the chance of indentations or scratching to the surface of the floor. Do not use narrow chair glides! Felt pads are also excellent protection for the floor for furniture that will be frequently moved directly across the floor.
Do not move heavy furniture, appliances or fixtures directly across the floor. Use protective boards or appropriate furniture movers designed for use over hard and/or resilient surface flooring.
Protect the floor from direct sunlight by using appropriate window coverings.
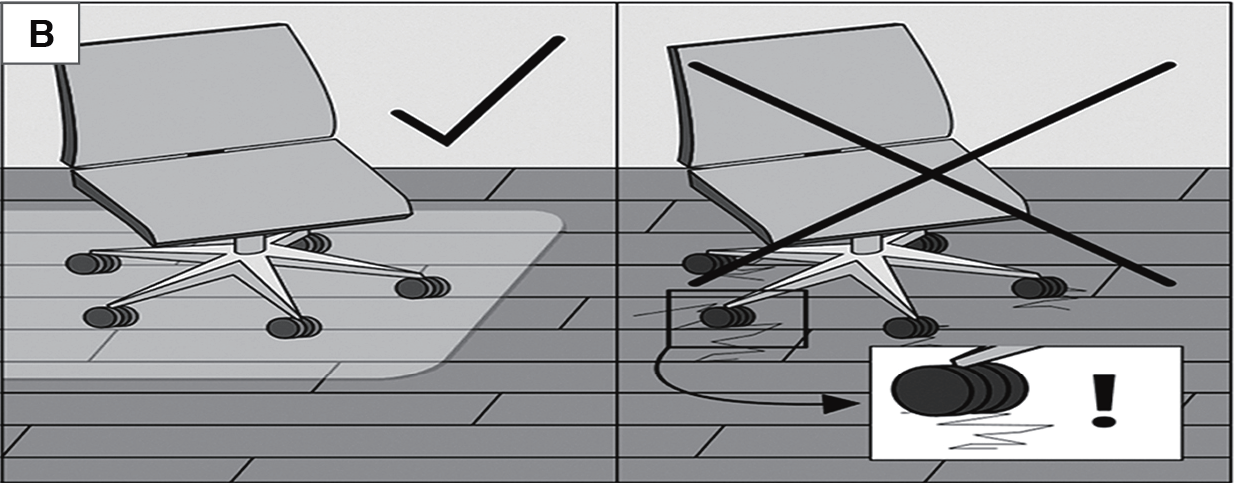
Use chair mats at desks to protect the floor from damage due to chairs or furniture with wheels. It’s a good idea to save a few planks in case of accidental damage. Planks can be replaced or repaired by a flooring professional.
WARRANTY
This guarantee is for replacement or refund of SPC plank flooring ONLY. No labor (including th cost of labor for removal or installation of the replacement floor) or costs incurred with loss of time, incidental expenses or any other damage. It doesnot cover damage from improper installationor maintenance, burns, fears, indentations, stains or reduction in gloss level due to normal use and or exterior applications. For more information please visit our website www.sunstonesurfaces.com.
Failure to follow Pre-Installation and Installation Guidelines will void the manufacturer’s warranty.
Claims
This guarantee applies only to the original purchaser and proof of purchase is required for allclaims.Claims for wear must show a minimum dime size area. This guarantee is prorated based on the amount of time the floor has been installed. If you wish to file a claim under warranty, contact the authorized dealer where the flooring was purchased.
A. Always use felt or rubber pads on furniture feet to prevent deep scrapes and scratches.
B. Rolling chairs must have a plastic mat underneath the wheels. Wheels cannot move or roll directly on the surface of the vinyl planks.
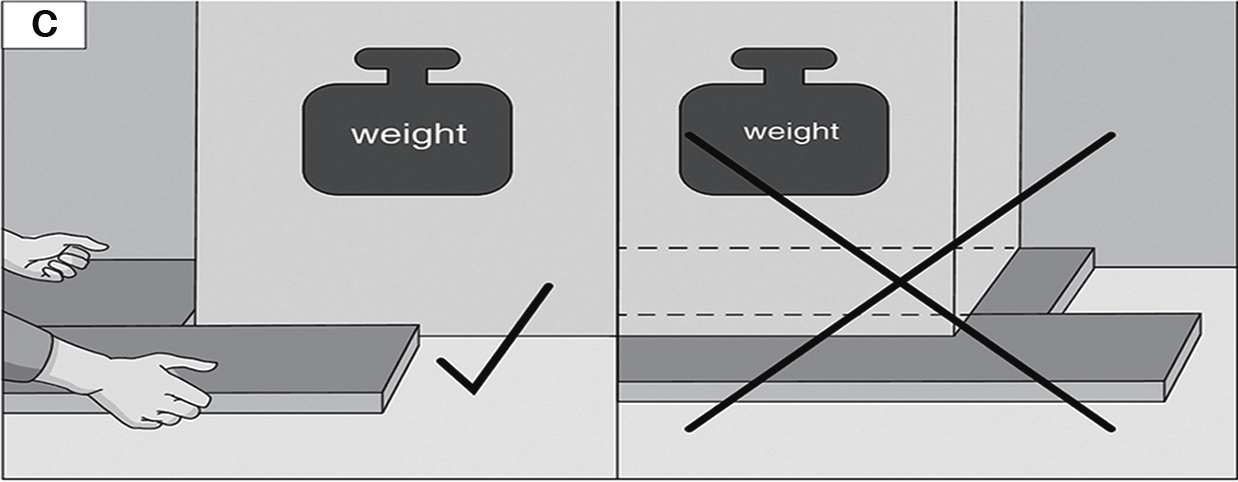
C. Planks must be installed around heavy items of concentrated weight such as islands, cabinets, appliances, etc.
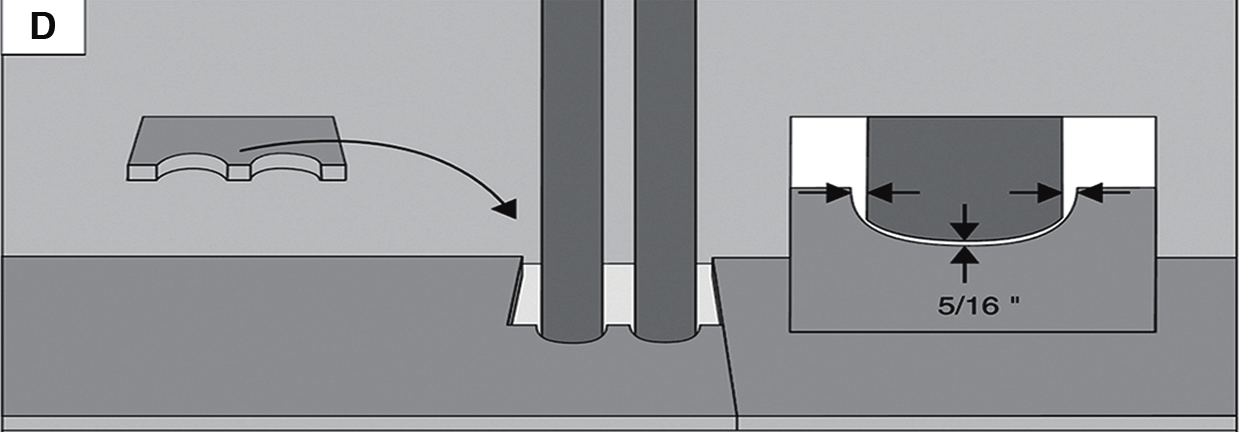
D. Leave a gap of 5/16” for any protruding structures extending from the floor.
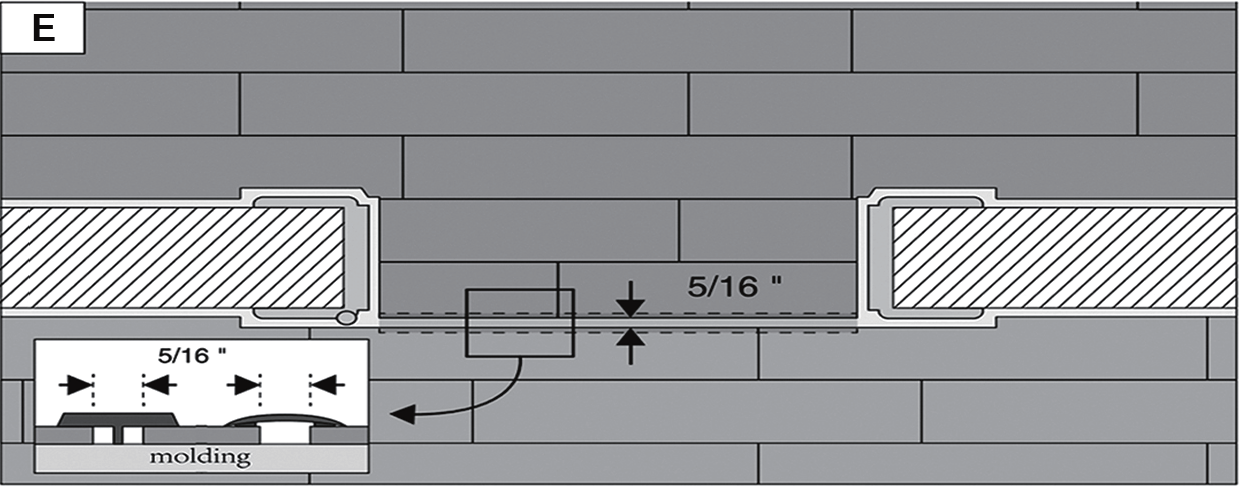
E. Leave a gap of 5/16” between vinyl planks and the notch inside the T-molding and reducer.
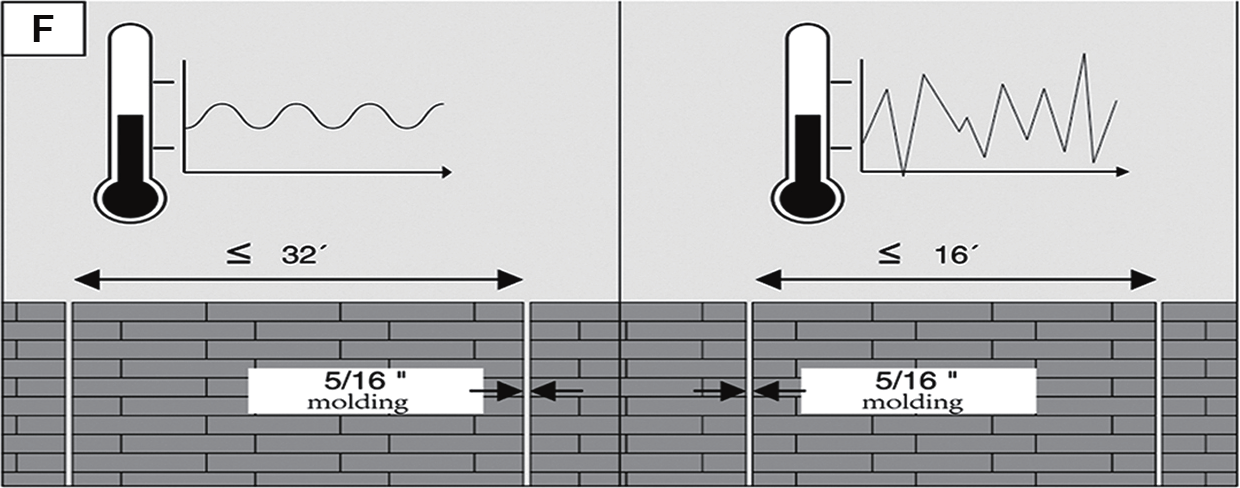
F. For room temperatures of 65°F to 80°F year-round, a maximum of 32’ of flooring can be installed before a break in the floor must be introduced. For rooms with a higher temperature fluctuation, a maximum of 16’ of flooring can be installed before a break in the floor must be introduced.
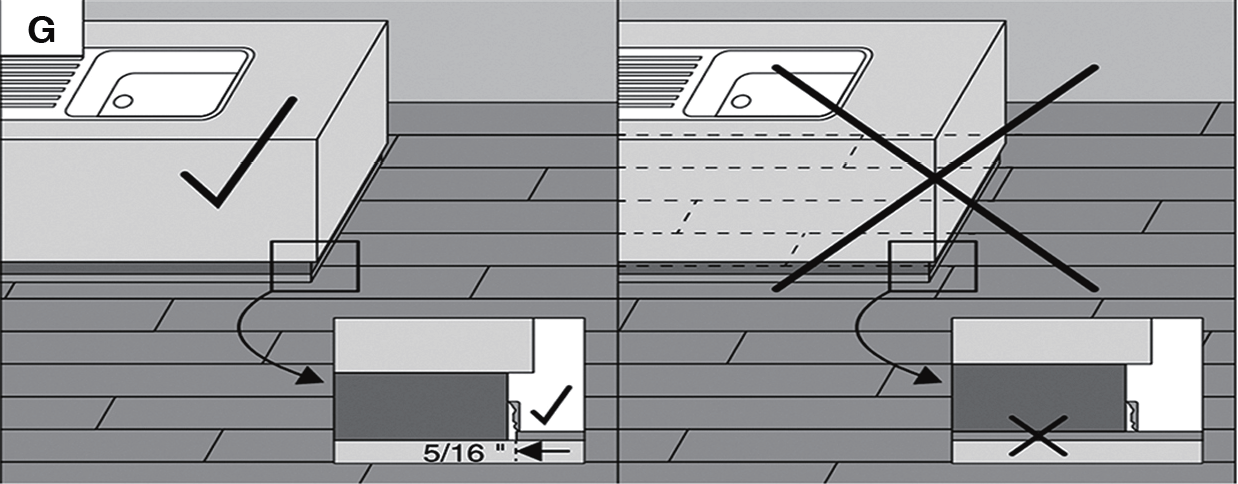
G. Planks must be installed around kitchen islands and cabinets. Leave a gap of 5/16” between vinyl planks and kitchen island and cabinets. A quarter round can be used to hide the 5/16” gap.
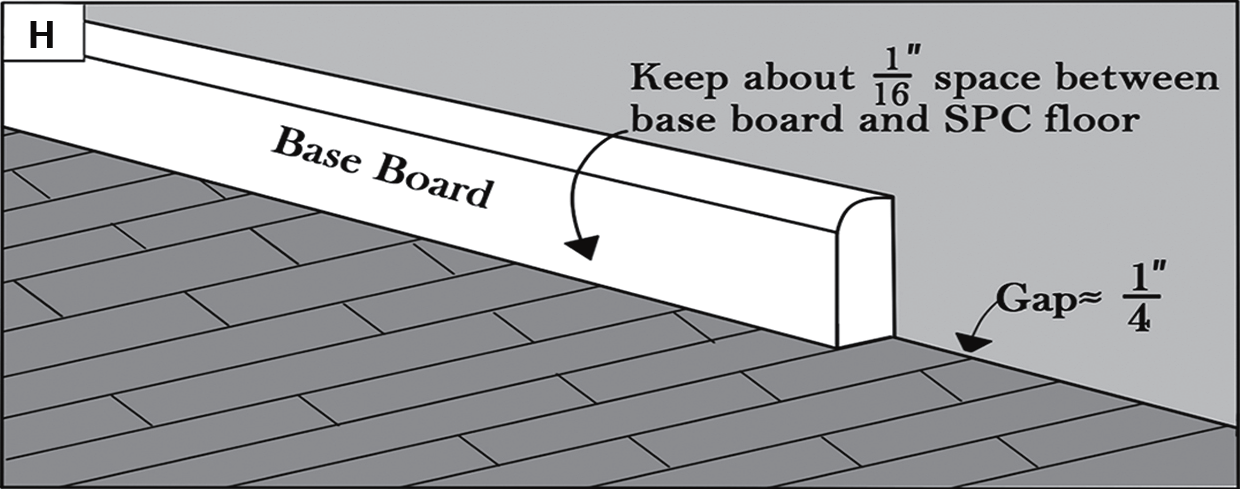
H. Leave a gap of 1/4” between vinyl planks and wall. Leave a gap of 1/16” of gap between baseboard and vinyl floor. Baseboards and quarter rounds should not sit directly on top of vinyl.
* Failure to follow Pre-Installation and Installation guidelines will void the manufacturer’s warranty.